Pages

Tuesday, February 26, 2013

Artisan Embellishments

Today I'm sharing a couple of cards I made using the Artisan Embellishments Kit from Stampin' Up's Spring Catalog.  The color combinations for this kit are Crumb Cake, Primrose Petals, Pool Party and Very Vanilla.  I think the embellishments are perfect for vintage cards.  Get ready for a lot of sponging!


The first card was made with vanilla cardstock with all the edges sponged with Soft Suede ink.  Then I layered a piece of 4" x 5.25" First Edition Specialty paper with edges also sponged with Soft Suede ink.  The kit comes with two double-sided tags - white on one side and kraft on the other side.  I used the kraft side of one tag and sponged it with Crumb Cake.  I added the ribbon, the rose and the buttons.  The sentiment is from the Vintage Verses stamp set and was stamped with Primrose Petals ink on a punched vanilla cardstock.  I also sponged the sentiment label with Soft Suede and added the pearl.


The next card was also made with vanilla cardstock sponged with Soft Suede ink.  I sponged the white doily heart with Soft Suede to get the vintage look.  This time I sponged the tag with Primrose Petals on the kraft side.  I added the ribbons, roses, pearls and the love label served as the sentiment.

One last note, the roses in the kit were really light so I sponged them with Regal Rose ink which is a shade lighter than Primrose Petals.


I like how they turned out but the embellishments are so bulky I don't think they're suitable for mailing, definitely hand delivery only.

Thanks for joining me today.  Until the next post...........

Cheers!!!

irene


All supplies used are from Stampin'Up.


Thursday, February 21, 2013

Flower Fair Simply Scrappin' Kit - Mini Album

As I mentioned on my last post, I have enough leftover materials from the Flower Fair Simply Scrappin' kit to do a mini accordion album.   I originally intended to do an album for the boys in our family.  I was still trimming the card stocks and double-sided paper when another inspiration hit me.  How about an Easter accordion card?  This is the front cover.


 If you want to know all the details, stick around and join me for an inspired project.

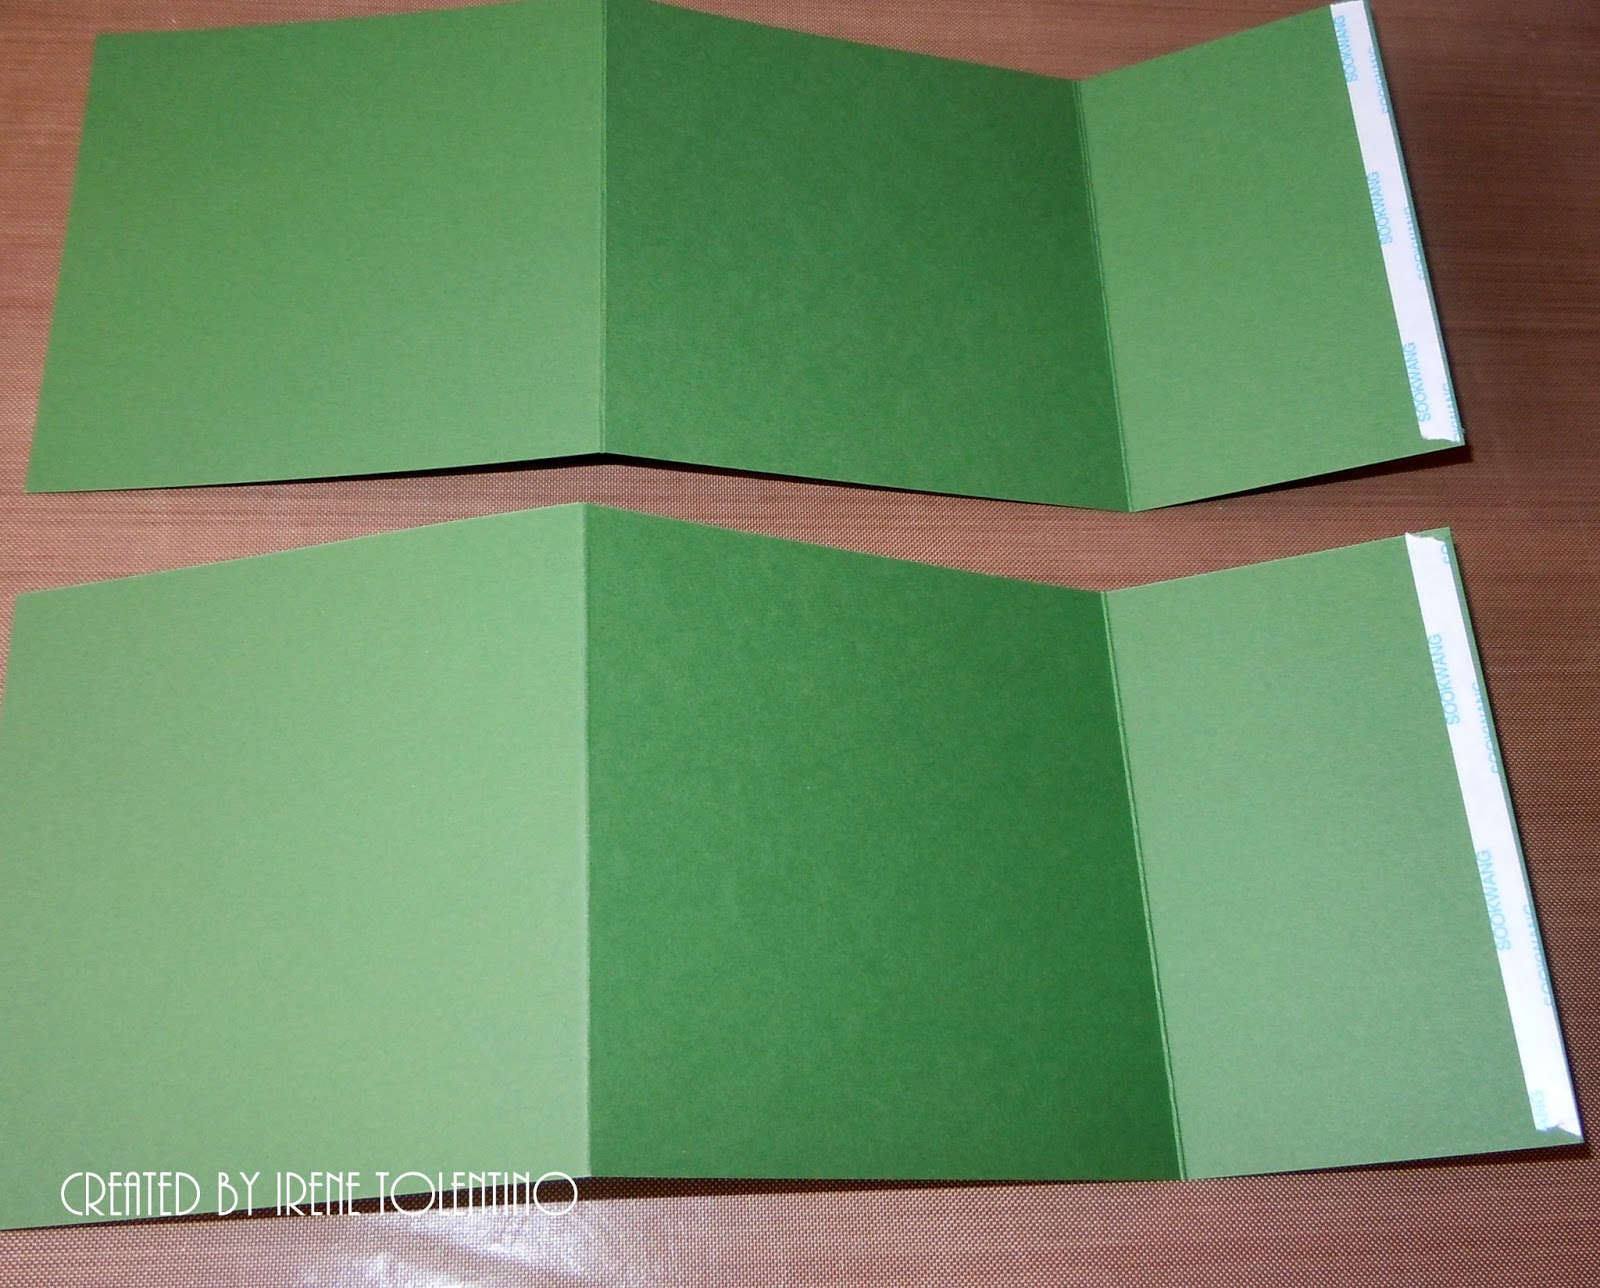
I started with two pieces of 4.25" x 11" Garden Green card stock.  I scored both pieces at 4.25" and 8.50" mark.  I added double-sided tapes as shown.


I adhered the two card stocks together to form the accordion.  When you join the two "short" ends, make sure the joint panel measures 4.25" and you have five panels with the same measurements.


I cut 8 pieces of double-sided paper measuring 4" x 4".  I also cut two pieces of Regal Rose card stock measuring 4" x 4" for the front and back "cover".


Attach the double-sided paper to the inside panels on both sides.


 Now onto embellishments!  I used Regal Rose card stock for the front and back "covers".  Both pieces were dry embossed using the Flower Garden embossing folder and sponged with Regal Rose ink for added dimensions.  I used the Crosses of Hope stamp set for the centerpiece.  I die cut a white glossy card stock using the Labels Collection Framelits and I stamped the floral cross with black StazOn.

I masked the cross and "drew" light rays around the cross using white crayola pencils.  I guess this could be a variation of the crayon resist technique.  I can't find any of the white crayons I normally have around.  Then I sponged the whole image with Daffodil Delight ink.  As you can see, the light rays I drew were so lame I decided to try a sunburst brass stencil.  Any of you remember the brass stencils SU used to offer?  I kept all of mine and still use them from time to time, although this particular stencil is not from SU.


I used a blender pen to color the leaves and flowers on the cross.  The sentiment from the Well Scripted stamp set was stamped with Garden Green ink.  The butterflies were die cut using the Beautiful Wings Embosslits and sponged with Regal Rose and Daffodil Delight inks.  I don't have any wide Regal Rose ribbons so I used the Primrose Petals 3/8" Satin Stitched ribbon.


The back cover design is very simple compared to the front.  I positioned the ribbon on the back panel before adhering the Rose Regal card stock.  The sentiment from the Trust God stamp set was stamped in Garden Green ink, punched with the Decorative Label punch and sponged with Regal Rose ink.  The buttons are part of the kit and I've never used them on any of my previous projects so I made room for them here.


Each panel was decorated with the leftover card stock stickers.  And all the sentiments used were from the Trust God stamp set.  I also used colored rhinestones and die cut butterflies for embellishments.


And this is how it looks when it's closed.


That is it for the Flower Fair Simply Scrappin' kit.  I thank you for stopping by today.

Cheers!!!


irene


All supplies and tools used are from Stampin'Up except for the brass stencil.

Monday, February 18, 2013

Flower Fair Simply Scrappin' Kit

At our January group meeting I won the swap card contest and my prize was the Flower Fair Simply Scrappin' Kit Bundle from the Spring Catalog.


I decided to set aside the album and make cards with the kit instead of scrapbook pages.

I really like the double-sided papers in this kit and I thought the layout for triple-time stamping would work well to highlight the papers.  The first card was made using Garden Green card stock and the mixed floral paper.  The sentiment is from Well Scripted stamp set and was stamped with Garden Green ink.  The ribbon is a 1/8 taffeta in Regal Rose.  I hand cut the tiny flowers in the center panel and added rhinestones.


The second card was made with white cardstock and the other floral paper.  The ribbon is the 5/8" crochet trim ribbon.  The center panel is one of the card stock sticker that came with the kit, I just added rhinestones  to the flowers.  Sentiment is the same as the first card.


The next card is my favorite.  A great bouquet of spring flowers!   The card base is Regal Rose card stock.  The sentiment is also from the Well Scripted stamp set.  The Garden Green panel was dry embossed with the Fancy Fan embossing folder.  This time I added pearls instead of rhinestones.  What you can barely see behind the flowers is a double-sided paper die cut with the Top Note die.  The strip of flowers is a card stock sticker from the kit.


The next card was made with Garden Green and Daffodil Delight card stocks.  The sentiment is from the Vintage Verses stamp set and was stamped with Basic Black ink.  Rhinestones were added to the flowers and tag.


This is the messy version of the card above.  The same layout, same color combo and same elements and yet  a very different look.  A plain banner would have been more effective here than the floral banner.  I don't know what I was thinking but when it didn't quite looked right I kept adding flowers!


The next card has quite a few "hidden" mistakes!  I was almost done with this card when I realized that I didn't make room for the sentiment.  I didn't want another layer so I stamped the sentiment in Garden Green ink directly on the stripe green panel.  That was a mistake! The green sentiment was barely readable on the green panel.  I was about to toss the whole thing when it occurred to me to try sponging white ink on the green panel.  I lightly sponged white craft ink all over the panel and more heavily on the sentiment area to cover the green ink.  What do you know, it worked!  I dried the pigment ink with a heat gun and stamped the sentiment again.  Much better result this time.  I added the regal rose ribbon to fill the void and "tie" the sentiment with the elements below.  I think I salvaged this one, I hope.


Six cards, all from the kit.  There's enough leftover materials for a mini accordion album which I will tackle next.


Thanks for stopping by today.

Cheers!!!

irene


ALL supplies used were from Stampin'Up.


Sunday, February 17, 2013

Patty's Peppy In Color Challenge

My upline, Patty Bennett, recently posted a color challenge for our team to try out.  I seldom venture from two-color combination so this is fun to try out.  I love Lucky Limeade and Island Indigo together but never really made anything with Calypso Coral.

Color combo-001

This is what I came up with.


I started by die cutting white and calypso coral card stocks using the Hearts A Flutter framelits dies.  Then I stamped the die cuts with images from  Hearts A Flutter stamp set and the flower from Blooming with Kindness stamp set.  The sentiment was stamped with image from Make a Wish stamp set and punched with the Decorative Label punch.

The ribbon is a 3/8" ruffled ribbon in lucky limeade.  I sponged lucky limeade ink around the card and island indigo around the sentiment label.

BONUS Card:  I used the leftover stamped die cuts to make this super simple card.


The base card is Lucky Limeade.  The Calypso Coral panel was dry embossed with the Fancy Fan embossing folder.  The white card stock main panel was die cut with the Top Note Die.  The sentiment is from the Vintage Verses stamp set and was stamped in Island Indigo.  The ribbon is 1/4" satin ribbon in Island Indigo.  The final touch, large rhinestones!

I had fun with this challenge.  Hmmmm, maybe I'll try other challenges out there.

Thanks for stopping by.

Cheers!!!

irene


SUPPLIES used are all from Stampin'Up.

Thursday, February 14, 2013

Hearts A Flutter Love Card


I'm so behind in posting my stuff.  Today's clean and simple cards were made with the new bundle from Stampin'Up called Hearts A Flutter bundle.  An 8-piece stamp set with matching 5-piece die set.

If you're familiar with my cards, you know when I want clean and simple I tend to go all white with a single accent color.  The first card is all white with Pool Party and the second one is all white with Rich Razzleberry.  The layout is the same, I just changed the color.

I dry embossed the front panel with Adorning Accents Folders.  I stamped and die cut the hearts with Hearts A Flutter stamps and dies.  I used the 1/8 taffeta ribbon in black  to border the embossed hearts.  The buttons are one of the freebie items you get during Stampin'Up's Sale-A-Bration.  I kept the sentiment simple so they can be used for Valentine or any occasion love note.


BONUS Card:  

I used the left over die cut hearts from the cards above to make another card.  I added the die cuts scallop hearts which were die cut from Hearts A Flutter framelit dies.  I also used the Needlepoint Border Embossing Folder from the Spring Catalog to dry embossed the front panel's top and bottom edges.  The little bows were made with white baker's twine.  Again, the simple sentiment makes this card a valentine or any occasion card.


I was hoping to post these way ahead of Valentines day but I have been so busy lately.

Thanks for stopping by today.

Cheers!!!

irene


All supplies used were from Stampin'Up.


Sunday, February 3, 2013

More Swallowtail Cards

I really like this image but I promise to put it away after these cards.

The first card is again in my favorite color combination - blue and green!  The swallowtail was stamped in black pigment ink and heat embossed with clear embossing powder.  I colored the image with sponge using Island Indigo and Lucky Limeade inks.

The card base is Lucky Limeade.  I embossed the Island Indigo cardstock with the Swirly embossing folder, my very first embossing folder by Cuttlebug.  The sentiment was stamped in white pigment ink and heat embossed with white embossing powder then punched with the Petite Curly Label punch from Stampin'Up.  Love how this turned out.  The ribbon is 1/4" satin in Island Indigo.


The colors I used on this card are Raspberry Ripple and Summer Starfruit.  The image was also stamped in black pigment ink and heat embossed with clear embossing powder.  I used a blender pen to apply color to the image.  The ribbon is 3/8" stitched satin ribbon in Summer Starfruit.  The sentiment was stamped in black pigment ink.


Okay, that's all the swallowtail cards for now.

Thanks for stopping by today.

Cheers!!!

irene


All supplies used were from Stampin'Up except the embossing folder.

Saturday, February 2, 2013

Thank You Treat with Mini Note Card

I made this treat bag for my son's tutor.  She's so sweet and patient with him I wanted to give her a note of appreciation and a small treat.  Her favorite color is green, so the set was made in different shades of green.

The purse was made with Stampin' Up's Petite Purse Bigz L die.  I did the faux leather technique on the flap.  After it was die cut, I rubbed just the top part with Versamark ink and applied clear embossing powder.  Then I drew the lines with a toothpick before heat setting the powder.

Instead of the die cut handle, I used a black chain attached with black brads.  I used designer brads for the accent "medallion".  Isn't this the cutest thing?


I stamped the sentiment on strips of card stock and wrapped those around the nugget chocolate and placed them inside the mini purse.  I also made a small 3" x 3" note card.


I put the bag and note card in a clear cello and tied a ribbon.  I wanted to do a tag to hang on the ribbon but I was out of time.

Thanks for stopping by today.  Until next time......... Cheers!!!

irene


All supplies used were from Stampin;Up except the black chain.